Goal
Integrate intercom to https://tombriches.com/
Installation
Copy and paste this code snippet before the </body> tag on every page you want the messenger to appear
<script>
  (function(){var w=window;var ic=w.Intercom;if(typeof ic==="function"){ic('reattach_activator');ic('update',w.intercomSettings);}else{var d=document;var i=function(){i.c(arguments);};i.q=[];i.c=function(args){i.q.push(args);};w.Intercom=i;var l=function(){var s=d.createElement('script');s.type='text/javascript';s.async=true;s.src='https://widget.intercom.io/widget/z3x0st3y';var x=d.getElementsByTagName('script')[0];x.parentNode.insertBefore(s,x);};if(document.readyState==='complete'){l();}else if(w.attachEvent){w.attachEvent('onload',l);}else{w.addEventListener('load',l,false);}}})();
</script>
Replace the example variables below in the boot call with your own user data variables. Once your app initializes, add the boot call where you load user data.
window.Intercom("boot", {
  api_base: "https://api-iam.eu.intercom.io",
  app_id: "z3x0st3y",
  user_id: user.id, // IMPORTANT: Replace "user.id" with the variable you use to capture the user's ID
  name: user.name, // IMPORTANT: Replace "user.name" with the variable you use to capture the user's name
  email: user.email, // IMPORTANT: Replace "user.email" with the variable you use to capture the user's email address
  created_at: user.createdAt, // IMPORTANT: Replace "user.createdAt" with the variable you use to capture the user's sign-up date
});
Update Intercom whenever the view or URL changes in your app. This allows people to receive your most recent messages.
window.Intercom("update");
Important: we have to use non standard domain:
eu.intercom.io, please be aware of that, because there will be no readable error.
Fill user data
Example user data from Easy-Rocket
{
    "address": "Mazepi3", // skip
    "birthday": "1988-08-22", //skip
    "birthdayAlreadyChanged": true, //skip
    "bonusBlocked": false, //skip
    "city": "Kiev", //skip
    "country": "DEU", // 'country' field
    "countryAlreadyChanged": false, //skip
    "email": "[email protected]", // 'email' filed
    "emailConfirmed": false, //skip
    "id": 6858, // 'user_id' field
    "language": "en", // 'language' field
    "level": 0, // 'level' field
    "login": "nosov_nodeart.io", //skip
    "name": "Konstantin", // 'name' field
    "phone": {
        "code": "49", // 'Phone' field, "+"+code+number
        "confirmationStatus": 0,
        "number": "505535424",
        "numberAvailableInput": 3,
        "numberAvailableSending": 2,
        "timeAvailableSending": 0
    },
    "points": 0, // 'points' field
    "postcode": "000", // skip
    "referralCode": "dAMCQ3VnFXBjcRF0cHlTEg==", // skip
    "region": "", // skip
    "sex": "m", // 'geneder' field
    "shopPoints": 0, // skip
    "smsAutentification": false,
    "surname": "Nosov", // 'surname' field
    "timezone": "" // skip
}
lets suggest that data stored in profile variable, then resulting code will be like that:
window.Intercom("boot", {
  api_base: "https://api-iam.eu.intercom.io",
  app_id: "z3x0st3y",
  user_id: profile.id,
  name: profile.name,
  surname: profile.surname,
  email: profile.email,
  country: profile.country,
  language: profile.language,
  level: profile.level,
  phone: "+"+profile.code+profile.phone,
  points: profile.points,
  geneder: profile.sex
});
Additional fields
Fields that we would like to have, but they are missing:
Created at
"Created_at" in Unix timestamp format (like 1350466020)
created_at: user.createdAt
We would like to observe registration date in intercom user profile.
Add Tags to FrontEnd
In admin panel we can assign tags:
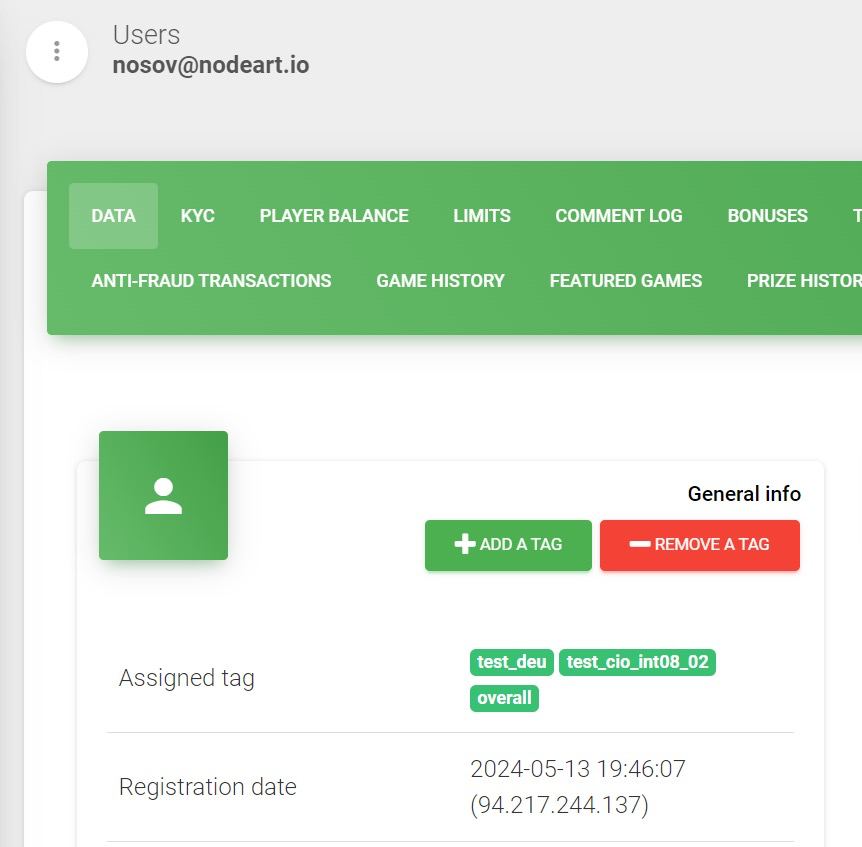 For example we have tags: “test_deu”, “test_cio_int08_02”, “overall”.
We would like to transfers to intercom, but we are aware, that not all tags are public.
We suggest adding tags with prefix “public_” to user profile.
For example: “public_test_deu”, “overall”. First tag should be passed to profile, and then added to intercom. The second tag should stay on backend.