In just 6 simple steps!
Most of you have already created server-less functions which generates dynamic IP address(es). Mostly all this happens at the backend and you don’t have to worry about it. Trouble begins when you need to have a static outbound IP address of your function. It is generally required as a safety measure (for whitelisting) when integrating with external APIs (like PayTM payout APIs, Msg91 APIs etc). So here in this article, we will see how to create a firebase cloud function that has a static outbound IP.
By default, all the firebase cloud functions created have dynamic outbound IPs. To have a static outbound IP, you need to connect your cloud function to a VPC Connector which is connected to a Cloud NAT gateway config using which the traffic originating from the VPC network will have a static IP.
In simple terms, you will connect your cloud function to a VPC Connector. This VPC will somehow be configured to tell the cloud function to pass the traffic using the static outbound IP from the VPC.
Okay, so now that we know what to do, let’s first set up our VPC and then will link the same to our function. (I am assuming you already have gcloud cli setup and have a running firebase account)
Step 1 : Find the name of your VPC network
Run this command in terminal to check the networks list
gcloud compute networks list
You should see an output like this

Output in terminal
Here you can check the name of your VPC network. Most of the times, it will be default.
Step 2 : Create a new Cloud Router
Run the following code to create a new router
gcloud compute routers create ROUTER_NAME \
–network=NETWORK_NAME \
–region=REGION
Here, replace :
ROUTER_NAMEwith the name of the new Cloud Router.NETWORK_NAMEwith the name of the VPC network found in Step 1REGIONwith the region name. It is better to use the same region where your functions will be/are hosted.
Step 3 : Reserve a static IP address
Run the following command in terminal
gcloud compute addresses create ORIGIN_IP_NAME –region=REGION
In the command above, replace:
ORIGIN_IP_NAMEwith the name you want to assign to the IP address resource.REGIONwith the region that will run the Cloud NAT router. Ideally the same region as your Cloud Functions to minimize latency and network costs.
4. Create a Cloud NAT gateway configuration on this router:
Run the following command
gcloud compute routers nats create NAT_NAME \
–router=ROUTER_NAME \
–region=REGION \
–nat-all-subnet-ip-ranges \
–nat-external-ip-pool=ORIGIN_IP_NAME
In the command above, replace:
NAT_NAMEwith a name for the Cloud NAT gateway resource you want to create.ROUTER_NAMEwith the name of your Cloud Router.REGIONwith the region in which you want to create a NAT gateway.ORIGIN_IP_NAMEwith the name of the reserved IP address resource you created in the previous step.
This is needed to route the traffic originating from the VPC network using the static IP address you created in Step 3
Step 5 : Create the VPC connector
Run the following commands to create the connector
gcloud services enable vpcaccess.googleapis.com
gcloud compute networks vpc-access connectors create CONNECTOR_NAME \
–network VPC_NETWORK \
–region REGION \
–range IP_RANGE
Replace the following:
CONNECTOR_NAME: a name for your connectorVPC_NETWORK: the VPC network name found in Step 1REGION: a region for your connector; this must match the region of your serverless serviceIP_RANGE: This IP range must not overlap with any existing IP address reservations in your VPC network. For example,10.8.0.0/28works in most new projects. The value supplied is the network in CIDR notation (10.8.0.0/28).
To verify wether your connector is ready or not, run the following command
gcloud compute networks vpc-access connectors describe
CONNECTOR_NAME \
–region REGION
Replace the following:
CONNECTOR_NAME: the name of your connector; this is the name that you specified in the previous stepREGION: the region of your connector; this is the region that you specified in the previous step
The output should contain the line state: READY.
Step 6 : Link the function and deploy 🚀
Now we are all set. All we need to do now is create the required function and link it to the VPC Connector. I have attached a dummy function code below which prints the outbound IP address. Have a look.

Code Image created on codeimg.io
While running this function, you will see the outbound IP Address will always be a static IP Address which was set in Step 3. Keep in mind to replace the CONNECTOR_NAME in the code with your actual VPC Connector name set in Step 5 above.
Voila! All done now. Now you can have the ease of having a static IP within the comfort of firebase cloud functions. Enjoy!
🐞 Debugging
- To cross check the IP Address created in step 3, run the following command. This will show a list of all IP addresses and with their names against it.
gcloud compute addresses list
- If you have already created a function and are now re-deploying the function after linking it to the VPC Connector, sometimes it would not reflect properly. It is majorly because the functions trigger line does not get updated when a function is re-deployed.
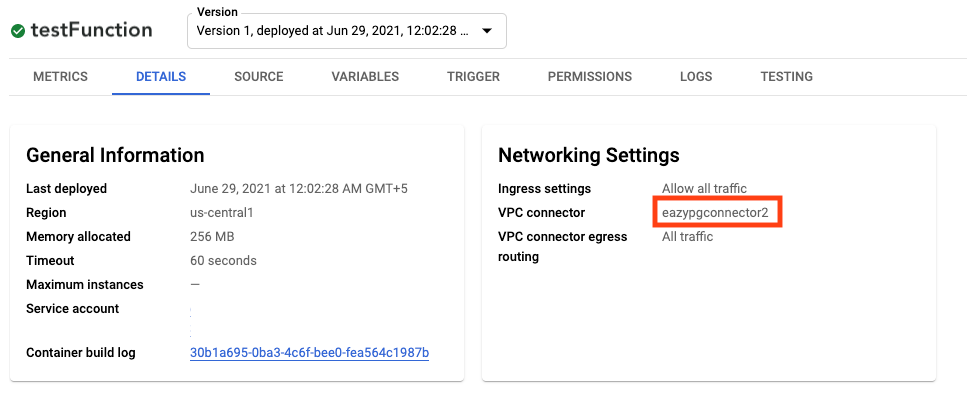
Either create a new function, or delete the existing one and then re-deploy again. To check wether your function is linked to your vpc connector or not, hop on to console.cloud.google.com. Navigate to your deployed cloud function and open it’s details tab. You should see your VPC Connector name in the network settings section.
Or open this link after replacing it with your project and function name :https://console.cloud.google.com/functions/details/<REGION>/<FUNCTION-NAME>?project=<PROJECT-NAME>&tab=detailReplace :
-REGIONwith your project’s region
-FUNCTION-NAMEwith your function name
-PROJECT-NAMEwith your firebase project name
You should see something like this 👇
Some useful resources for further clarifications :
https://cloud.google.com/run/docs/configuring/static-outbound-ip